Showing posts with label frugal. Show all posts

Tuesday, August 14, 2012

The S.O.S. Challenge

S.O.S. can mean several different things...Save Our Schools, HELP!!!, Switched On Schoolhouse. Anything with an S-O-S configuration, really. Right now, for me, it is an acronym for Sick Of Stuff. It's time to get serious about Stuff around here.

As I've gotten older, wiser, and more free of debilitating emotional issues, I have found that I'm somehow a better housekeeper. Do not read I'm A Perfect Housekeeper and My Home Should Be Featured In BHG there, please! I just mean that my home does not look like my bedroom did as a child...most of the time. If the kids have been running amok, well, it might look kind of like that. But, in general, you can see the floor and dont' have to walk on Stuff or shovel a path through Stuff to get around. The OTHER horizontal surfaces around here, however, typically have lots of Stuff on them. And I hate it.

For instance, my kitchen counter is a long L-shape wth a stove at one end. There is a particular corner that I have dubbed The Black Hole. Not sure why, actually - black hole implies that things go in and are never seen again. I guess it's more of the Event Horizon thing...if it gets close to that particular area, it ends up on The Pile. I do usually see it again, when I get sick of the Overflowingness and decided to "declutter" the Black Hole. 

I have wanted Simplify for a long time, but I'm not sure what has held me back...and still does.  When I'm away from our home, say at church for example, I get this overwhelming desire to go home and start Chucking Stuff. I feel up to it, I feel Inspired and Motivated. And, I get home and find that I just can't do it. Even though I haven't touched the papers in a certain file in my file cabinet for at least two years, I can't bring myself to throw them away. It's pathetic. 

Yet I long to be Free Of Stuff. I hate the choking, claustrophobic feel of all these things. Things that gather dust. Things that stare at me and remind me how disorganized I am. Things I am in bondage to, because I can not throw them out or give them away. Things that aren't worth much of anything, really. Sometimes, I think about things like What if there was a Natural Disaster and We Lost Everything. Would I survive? Of course I would. I don't really NEED most of this stuff! 

And so, I have decided to challenge myself to fill up a box or bag every day of Stuff to remove from my home. Whether it goes to the trash can, consignment shop or thrift store doesn't matter. It doesn't even matter what size of box or bag, as long as something goes out of the house every day.  It's just got to go. I'm calling it the SOS Challenge. I'm going to start this September 1, 2012...feel free to join me and share what your're doing! 

I love freecycle, but I can't wait around for people who may or may not show up to collect whatever I'm freecycling....I know myself too well. That may work for you, but it won't for me. There's a Goodwill drop box a few blocks from me, and if I have a small bag, I can also get some exercise and ride my bike down to drop it off. I also go to an area that has a Goodwill store (and I get coupons when I drop off my donations...wait, that would probably work against me!). And if nothing else, I can set it out by the road with a "FREE" sign and it will probably be gone in no time. 

Any challenge needs an outline, rules, goals....I'm going to think on those things and post what I come up with in a few days. For now, I have to work on psyching myself up for this challenge. To get rid of whatever it is that hinders me so I can get rid of all this Stuff that does not make me happy or serve a useful purpose in my life. 

Thursday, September 1, 2011

DIY Planner: Revised and Improved for 2011-12

It’s that time of year again! Do you have your planner ready? Do you buy one already made or do you design your own? Last year, I learned that I can make my own planner very inexpensively. AND I could make it however I wanted. Determined to not end up with a bunch of pages unused because they just don’t suit my record-keeping style, I designed my own and took it to a local office supply store with a print center to have it coil bound. You can read about that here and see what that planner looked like. This year, I made some drastic changes…

I was quite surprised and irritated to find that I still had a bunch of pages that I didn’t use. It looked good, but that planner just did not suit my style. I was trying too hard I guess. After heading back to the drawing board with K.I.S.S. in mind (you know, Keep It Simple Sweetie), I finally had to come to grips with the fact that we are, in fact, UNschoolers. Unschooling does not lend well to traditional record keeping.

My biggest beef with trying to keep track of what we do every day is that the majority of our learning is cross-curricular. I don’t want to write an activity or lesson down in three different subjects every time. I want to write it down once and be done with it. And I would find myself agonizing over where to put something because I only wanted to write it down once…paralyzing the decision making process and driving me nuts.

So, I decided, why fight my nature? Why not find a way to embrace it in all its disorganizedness creativity? We don’t just “do school” at home…we learn where ever we are, whatever we are doing, whomever we are with. Life is our classroom! And something as large and complex as life is not going to be easily contained in little squares on an 81/2” x 11” piece of paper. Life is also messy and frequently goes outside of the lines.

I found a website called Homeschool Launch where you can download TONS of free worksheets, forms, and other helpful documents for home schooling. You can also create your own account to upload documents to share. You can find the forms I created for my planner this year at my page on Homeschool Launch.

What did I do differently? To start with, I had more time to put into designing the cover. Since we learn all year long, I chose pictures of things we did over the past year and this summer, such as my daughter using a magnifying glass on a scorcher of a day to start stuff on fire. We LOVE science!

1 front cover
Front cover...covered with pics of my kiddos!

The guy who did my planner there last year accidentally forgot to put something on the cover page before laminating and had to double-laminate it, which I really liked, so I asked them to do it again. Especially since the paper I chose this time was thinner.

On the inside cover, I made a copy of something I have hanging on our school cabinet. It’s an adaptation of something Nancy Campbell wrote in The Power of Motherhood. I figured it would be a good reminder, in case I ever forget how to homeschool…

2 inside front cover

I only have three, yes three, planner pages bound in this planner: a yearly goals sheet, an attendance sheet, and a yearly evaluation sheet. Well, there’s some monthly calendar pages, but more on that in a minute.

3 yearly goals
Yearly goals, right there when I open it up
so I don't write them down and forget them later!
4 attendance
Attendance sheet, courtesy of donnayoung.org
used this last year and really liked it.
5 yearly evaluation
Yearly evaluation, where we can write down
what worked and what didn't, what we liked or disliked
about the school year
Now this is where I got innovative. I bought six two-pocket folders without prongs when they were super cheap and had them bound in the planner. The first one will hold miscellaneous forms and records that we collect through out the year, such as important papers for Friday School, for example.

6 misc forms
Miscellaneous forms and records and important papers
will go in here
I created my own monthly calendar pages for the year and printed them out on cardstock. I have them facing each other, and used the blank back sides as a place to jot down notes and reminders. I searched online for a few minutes while trying to create something fun and interesting for a place to scribble notes, looking for something resembling a yellow legal pad for a background or graphic I could use. Then it hit me – I have a color copier/scanner and a yellow legal pad. Duh. So, I grabbed the Sharpies and ended up with this:
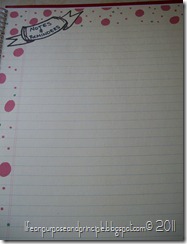
7 notes and reminders
I always need ample space to jot stuff down
8 calendars
I also need calendar pages to face each other so
I don't forget important dates coming up in the
next month
There is a set of two calendar pages in front of each folder. I used photo paper to print “labels” because it looks nicer. Not sure if the glue stick I used will sufficiently hold them after using it for a while, but that is easily fixed. I used Avery Design Pro to design the cover and the folder labels. Each folder will hold the Daily Learning Log Sheets for two months. This was the genius idea birthed at the drawing board. Planner pages don’t work for me because that is just not how I roll. This sheet has five large boxes to write lesson plans, activities and spontaneous learning opportunities. To the right are several check boxes with categories such as science, math, english, etc. This way, I can write in our unit study or when we stopped at a pond and observed the activity in the habitat or whatever and just check off what subjects were covered. I’ll print out 90 two-sided sheets of these and we will use them to record what and how we are learning each day. Of course, we can use more than 180, but that is to be sure we log in enough learning days to meet our state’s requirements.

9 month folders
Each pocket would only need to hold
15 sheets at the most. That's logging in
learning every day of the month!
91 daily log sheet in folder
I was very happy that the coil binding didn't
take up too much of the folder's edge so
the papers will still fit nicely.
I like having a full year’s calendar to look at in a place that is easy to find. Last year it was on the outside of the back cover. This year I decided I wanted it on the inside of the back cover. No particular reason, really. That’s just where I wanted it this time.

92 inside back cover
Always knowing where the whole year can be seen
is a huge benefit for me. I hate flipping through pages
to find things!
I was afraid it would be too bulky, but it’s really not. Of course, it’s not full of papers yet, either…
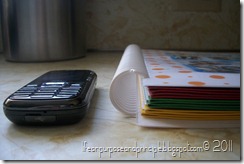
93 size comparison
This isn't one of those fancy smart phones, just an LG Rumor2
but I thought it would give a decent size comparison on
how thick it is. 
I would have preferred different colors for the folders…like orange and blue…but hey, they were only like  15 cents apiece or something like that. We are trying to do school free or as close to it as possible this year in order to save money for a family trip to California in a few months to see the middle of the oldest boys graduate from Marine boot camp. Guess how much this planner cost me this year? Less than last year!
  • orange polka dot paper, 25 cents each at Michael’s    $0.50
  • two-pocket folders, 6 @ 15 cents                              $0.90
  • printing costs, text documents                                   $0.60
  • paper (negligible, due to rebates making the ream
    • practically  free!)                                             $0.05
  • printing costs, color glossy photos (paper was free)    $0.10
  • double laminating, 8.5 x 11 coil binding                    $4.44    
    • 20% off coupon!
  • GRAND TOTAL……                                                    $6.59

I’m really excited about using this planner/organizer this year. It’s simple. It’s flexible. It didn’t cost an arm and a leg. And, it’s got cute pictures of my precious children on it. What more could I want?
If you make your own planners, what do you do? Do you change it every year or pretty much stick to the same format. Or, are you still trying to find something that works for you?

Thursday, March 31, 2011

[Pt 3] K12FreeHomeSchool and Mimi Rothschild: My Own Experience

In my eagerness to present a true account of my experience with K12FREEHOMESCHOOL and Mimi Rothschild, I did not count the cost in how I presented my story. I'm afraid that it's possible that the manner in which I structured my posts was not as helpful as I'd hoped. I in no way wanted to hinder or harm Mrs. Rothschild or her business. I did not consider that perhaps people would not read all three posts to get the "whole picture" and only focus on the less than flattering aspects of my experience. In an effort to present the whole story and not provide opportunity for others to link to only the bad parts of my experience, I have consolidated this three-part series into one. You can read it here...I've provided a summary of my experience and then the original, unaltered posts follow. 

Monday, March 28, 2011

[Pt 2] K12FreeHomeSchool and Mimi Rothschild: My Own Experience

In my eagerness to present a true account of my experience with K12FREEHOMESCHOOL and Mimi Rothschild, I did not count the cost in how I presented my story. I'm afraid that it's possible that the manner in which I structured my posts was not as helpful as I'd hoped. I in no way wanted to hinder or harm Mrs. Rothschild or her business. I did not consider that perhaps people would not read all three posts to get the "whole picture" and only focus on the less than flattering aspects of my experience. In an effort to present the whole story and not provide opportunity for others to link to only the bad parts of my experience, I have consolidated this three-part series into one. You can read it here...I've provided a summary of my experience and then the original, unaltered posts follow. 

Friday, March 25, 2011

[Pt 1] K12FreeHomeSchool and Mimi Rothschild: My Own Experience

In my eagerness to present a true account of my experience with K12FREEHOMESCHOOL and Mimi Rothschild, I did not count the cost in how I presented my story. I'm afraid that it's possible that the manner in which I structured my posts was not as helpful as I'd hoped. I in no way wanted to hinder or harm Mrs. Rothschild or her business. I did not consider that perhaps people would not read all three posts to get the "whole picture" and only focus on the less than flattering aspects of my experience. In an effort to present the whole story and not provide opportunity for others to link to only the bad parts of my experience, I have consolidated this three-part series into one. You can read it here...I've provided a summary of my experience and then the original, unaltered posts follow. 

Friday, December 3, 2010

DIY: Make Your Own Marshmallows...Really, You Can!

OK, so this is totally against all the "real foodie" in me...but in my quest to spend as little money on things as I can by making as many things as I can myself, I have wondered:
  1. Can I make a healthy, or healthier, marshmallow?
  2. Is it even possible to make your own marshmallows without the benefit of ginormous industrial equipment or magical woodland elves?
Well, as it so happens, I can at least answer one of those questions...and it's Yes, You Can Make Your Own Marshmallows In The Comfort Of Your Very Own Kitchen!  I found this neat video tutorial (via Money Saving Mom...if you haven't checked her site out yet do it now, it's great!) on the Denver Bargains site...check it out! And amaze your friends this holiday season with delicious, easy and inexpensive "gourmet" marshmallows!

Meanwhile, I'm going to see if it's possible to make a healthy marshmallow...since corn syrup is on my NO WAY JOSE list these days...

Monday, November 8, 2010

Make it Yourself and Save Money!

I just added a post to my Purposeful Nourishment blog on making your own cream of mushroom soup, plus I've included a recipe for Taco Seasoning and my mother in law's famous Burrito Casserole. Come check it out!

Sunday, October 31, 2010

Confessions of an SLS Junkie: How I Went No-Poo

Have you heard of the No-Poo movement? It's quite interesting. I gave it a whirl, then did a guest post about it on my friend's blog, The Homesteading Hippy...come check it out! Really, her hubby read it and just totally cracked up. You'll love it, I promise! Just click that link down below there...

Saturday, July 17, 2010

How I've Been "Doing" Real Food on a Real Budget

...or at least on a budget like mine!  I've been learning a lot about "real" food, food that is nutrient dense and as close to its natural state as possible and not full of chemical preservatives, colorings, and flavorings. And thanks to A Peasant's Feast eCourse through The Nourishing Gourmet, I'm also learning how to do it on a budget.
Read more here: Purposeful Nourishment

Saturday, May 29, 2010

How I Made a 150 oz Bottle of Fabric Softner Last Almost a Year

I've been making my own laundry detergent now for over a year. I love that I don't have to spend all that money every month on laundry detergent. Some people get really frugal and give up fabric softner, but I figure if I'm saving that much money on the suds I can 'splurge' a little on the softy scenty stuff. I love clothes and sheets that smell delicious...I don't think I could voluntarily give up fabric softener that makes my clothes smell terrific!

There's a recipe I tried once for homemade fabric softener that uses hair conditioner, water, and vinegar. It was ok, but I wasn't that thrilled about it. One day at the store, for some reason, I decided to figure out the cost per ounce for the hair conditioner vs. some Snuggle. I was shocked to discover it was actually cheaper per ounce for the Snuggle than for the bottle of cheap hair conditioner I bought at a discount dented can place! Then I had the bright idea of using regular fabric softener instead of hair conditioner in the homemade fabric softener recipe. The result was surprisingly pleasing.

My favorite fabric softener in the world is Suavitel in the yellow bottle. I bought a 150 oz (1.17 gallon) bottle for $7.47 at WalMart on July 16, 2009. As of this posting, I have used the last of the straight fabric softener to make another batch of the homemade. I probably have half a batch left. So, that $8 bottle of fabric softener has lasted over 10 months!

How well does it work, you ask? I think it's terrific! It still softens the clothes and leaves enough of that delicious, sunshiney yellowy scent behind that I can smell it on the clothes, even several days after washing. And a plus is that it's diluted enough that it doesn't gunk up the fabric softener dispenser in my washer. I love it!

Here's the recipe:

3 cups distilled white vinegar
2 cups fabric softener (or hair conditioner - one regular size bottle is almost 16 oz)
6 cups water

Mix together, but don't shake or it gets all foamy. Store in an airtight container or old fabric softener bottle(s). I took an old vinegar bottle and marked the sides for how much of each ingredient so I wouldn't have to measure it each time. Now, since the Big Bottle of Fabric Softener was finally emptied, I keep it in there after I mix it. We got a new washer with a dispenser so it's easier to measure that way. I just use a capful per load, more or less depending on my mood or the load size.

Check for Swagcodes Here!

Integrity is a Lost Virtue, but I Choose to:

BlogWithIntegrity.com